Understanding the Windshield Replacement Process

Windshield Replacement Ocala Florida takes time and patience. It’s important to understand the process so you know what to expect when you schedule your appointment. Depending on the weather, the windshield replacement process may take longer than usual. Adhesives, cleaners, and primers work slower in colder temperatures. This can lead to a longer wait time until the vehicle is safe to drive.

Remove the Old Windshield

Windshield

Whether you have cracked or broken windshield due to a rock hitting it, the weather, or someone trying to rob your car, it’s important to replace it as soon as possible. Cracked windshields are a hazard for drivers and their passengers, especially on busy roads. The cracks can easily spread, making it harder to keep your vision clear.

Replacing a windshield is an easy project for a car enthusiast, but it takes time and careful planning. You need to have the right tools and materials to complete the job. You should also plan on spending about two hours doing the repair.

The first step in the process is removing the old windshield. A professional will use a windshield removal tool to cut the urethane seal that holds the glass in place. Typically, the tool is an 18-inch Urethane Cut-Out Knife. A stiff thin wire or guitar string can also be used to remove the windshield. The technician will also remove any clips, fasteners or retainers that may be attached to the windshield frame. This will help avoid damage to the vehicle’s trim or windshield during the replacement.

Once the old windshield has been removed, the technician will clean the area around the frame to make sure there are no tiny pieces of broken glass left behind. This will prevent them from falling into the urethane and making it hard to install the new windshield. The technician will also clean off any dirt or debris from the sides of the frame. Newer vehicles often have cameras and sensors embedded into the windshield that need to be calibrated after the windshield is replaced.

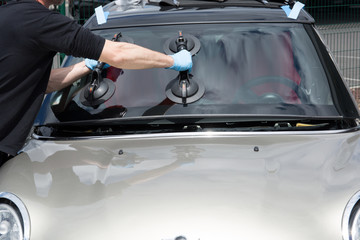
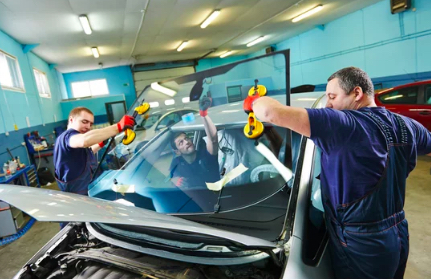
After cleaning the frame, the technician will coat it with fresh urethane. This will ensure the new windshield fits correctly within the pinch weld and that a good bond is made. The technician will then install the new windshield using suction cups.

Once the new windshield is in place, it’s important to allow the urethane to set before driving the vehicle. A few hours is usually enough to give the glue a chance to set properly. If you drive too soon, it’s likely that the windshield will crack further or even fall off.

Clean the Pinch-Weld

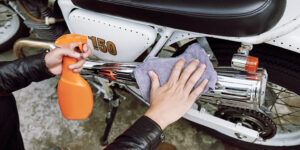
The pinch weld is a small gap between the body of the car and the windshield that holds or “pinches” the edges of the glass. Over time, dirt, dust and old urethane can build up in this area. This needs to be cleaned before installing a new windshield. Keeping the pinch weld clean helps ensure that the new windshield will fit properly in the gap and will be able to fully hold it.

When installing stationary glass on cars using urethane adhesives, it is important that the pinch weld flange be properly treated. This is because the flange supports the weight of the glass and, as such, can have an impact on the structural integrity of the vehicle. It is therefore crucial that any corrosion, primer or other coatings be removed from the bare metal on the pinch weld flange to allow proper bonding of the urethane adhesive.

In addition, it is essential that any bare metal be coated with a fresh coat of automotive epoxy primer (such as DPLF or DPLV 2.1 VOC) prior to installation of the new stationary glass in order to restore the bonding strength of the flange to the urethane adhesive. This is especially important when the flange is exposed to moisture, salt and other environmental contaminants that can damage the adhesive and reduce its ability to form a tight seal between the pinch weld and the glass.

During the process of repairing the chips and cracks in your Windshield, the professional glass technician will inject a special resin into each chip or crack, which will be heated by a heat source. This causes the resin to expand slightly, filling in the crack or chip, and then hardens to a strong bond. In addition, the professional will also apply a protective sealant to the surface of the windshield, helping it stay clean during and after the replacement process.

During the windshield replacement process, it is important for people to stay out of the way of the technicians. This is for both safety and comfort reasons. In addition, if someone stays too close to the technicians they may be struck by pieces of broken glass that fall during the process.

Apply Urethane

Urethane is the deep black type of glue used to install a windshield. It’s the kind of glue that gets onto everything it touches and is very difficult to clean up. It sticks to clothes, smears and marks hands for weeks after it’s applied. That’s why it’s important to apply it carefully and have a helper.

A technician applies the urethane using a tool that looks like a caulking gun. This makes the job much faster and easier than it would be if the technician had to sit inside your car and use a knife with a long handle. This tool also helps protect the technician’s back, neck and shoulders.

The first step is to apply a thin coat of primer. This step is not required for all urethanes, but it will help ensure that the new windshield adheres to the frame. A good primer will also prevent the metal from rusting in the future.

When the primer is dry, the technician can begin applying the urethane. Using an electric or air powered caulk gun, a bead of urethane is placed around the perimeter of the windshield frame. This is done as carefully as possible to avoid damaging the vehicle’s paint or pinch weld. Some installers put a mounting block at the bottom of the windshield to prevent air pressure leaks.

Once the urethane bead is in place, it’s time to put on the new windshield. This is usually the most dangerous part of the job, so if you haven’t done it before it’s recommended to ask for a helper.

The windshield is pushed into place and held in place with suction cups. Depending on the weather and the type of urethane your technician uses, the windshield should be set within about 30 minutes. Then the suction cups are removed and you’re ready to drive! (Don’t forget to replace the wiper blades.) You can expect to be able to drive your car in about an hour after the new windshield has been installed. Please leave the tape in place if your technician advises you to do so, as it will prevent the windshield from sliding during the curing process.

Put the New Windshield in Place

As the windshield glue dries, it forms a strong and waterproof seal around the new glass. Once the adhesive is fully dry, the technician will put the new windshield into place. This requires some patience as it can take 30-60 minutes to replace a windshield. The tech will first cover the dashboard and other parts close to the windshield to avoid any kind of damage during this process. The windshield wiper blades will also be removed to prevent them from being damaged in the process.

Once the windshield is in place, a technician will clean it with an abrasive pad and apply an activator. This will help the urethane glue stick to it. After that, the technician will remove any residue on the edge of the windshield and make sure it is properly aligned with the window socket. It is important for the technician to place the windshield in a proper position since if it is not placed correctly, it will cause leaks and air noises.

The last step is to use suction cups to hold the windshield in place until the adhesive is completely dried. It is important not to drive the car right after windshield replacement because it can cause the adhesive to lose its strength and cause the windshield to shift. It is recommended to wait for at least an hour before driving.

Using high-pressure car washes and automatic car washes in the first two days after windshield replacement can also cause issues since it puts a lot of stress on the adhesives. Other things to avoid after getting your windshield replaced include slamming the doors and driving on roads with lots of potholes.

Windshield replacement is a complicated and dangerous job for anyone to try at home. Even if you have the necessary tools, it is still not recommended to replace your windshield yourself. It is always better to let a professional do it and enjoy the peace of mind that comes with knowing you and your family will be safe. It is also a good idea to ask your insurance company about whether windshield replacement is covered by their policies.

Windshield Replacement – What to Expect From a Reputable Vendor

Getting a cracked windshield can be a real headache. Thankfully, Windshield Replacement Ocala Florida sells quality replacements at reasonable prices. It’s best to repair a small chip or crack immediately. If not, they can grow into a bull’s eye crack that puts your safety in jeopardy.

Windshield

A windshield has a large surface area that makes it vulnerable to impact damage. While it’s common to see minor chips in a windshield, they can easily spread to cracks that obscure your view while driving. These cracks are also unsafe as they can threaten the structural integrity of your windshield.

Windshield chips can be repaired rather than replaced if you catch them early. Delaying chip repair can lead to dirt infiltrating the crack and worsening the problem.

Most chips are caused by flying debris on the roadways, such as small rocks, pebbles, and other debris flung from vehicles at high speeds. Dump trucks and other road work vehicles also kick up airborne rocks that can cause windshield damage.

Generally, any nick in the glass that doesn’t penetrate the plastic interlayer is considered a chip. While many of these can be repaired, if you ignore them, they will eventually grow into cracks.

It’s not uncommon to hear the sound of a windshield cracking when it is not repaired immediately. While it is easy to brush off the sound of a cracking windshield, it’s important to know that it could quickly spread into a large crack that can obscure your vision and threaten the structural integrity of your windshield.

In addition to a cracking windshield, other issues can include spreading chips and a floater crack. These cracks appear in the middle of your windshield and are often the result of temperature fluctuations. This type of damage can be repaired by a professional, but you should always try to prevent it from occurring. You can do this by keeping your car in the garage during extreme temperatures and avoiding slamming your door or going over bumpy roadways.

Windshield cracks are more than annoying; they can seriously impact your vision. They’re usually caused by impacts from rocks or other debris kicked up by other vehicles on the road. Still, they can also be caused by manufacturing defects, extreme temperature changes, or even age. Regardless of the cause, a cracked windshield should be fixed immediately.

Generally, a windshield should be replaced if it has a crack longer than 3/4 of an inch. This is due to federal regulations from the Department of Transportation, as well as state laws that may have more strict requirements.

While cracks that aren’t in the driver’s line of sight can sometimes wait, most need to be repaired immediately. These include bullseyes, star cracks, half-moon cracks, and stress cracks, which can spread quickly.

These cracks usually begin in the outer layer of glass and chip off a piece of the windshield. Bullseyes are circular and can affect the whole windshield, while star cracks develop a star-shaped cavity that isn’t quite as wide. Half-moon cracks look like a crescent and can be caused by rocks or other objects hitting the windshield. Stress cracks develop when the windshield is under pressure. This can be due to a rapid change in temperature, barometric pressure, or when you slam your car door or hit a curb.

You can prevent these cracks from spreading by applying a thin layer of clear nail polish or super glue to the windshield. You can also use clear packing tape to keep dirt out until you can get the crack fixed. Avoid exposing your windshield to direct sunlight or using the defroster, and park in a garage if possible.

There are a few key points to consider when dealing with leaking windshields that need to be replaced. One is that leaks can occur in areas you might not know about. For instance, you might have a tiny leak in the corner of your windshield that drips down on the frame or even underneath the molding. These minor leaks often go unnoticed until they cause moisture problems in your car. The moisture can lead to mold, mildew, rust, and foggy windows.

Another cause of leaks is that the seal around your windshield may deteriorate, especially if it’s been a few years since you last had the windshield replaced. The deterioration in the rubber seal can also be caused by damage to your windshield from driving or falling debris.

If you’re experiencing a leak, there are several ways to test it yourself. One way is to put a piece of tape on the windshield seal when you hear the noises. Then, drive the car at the speed you usually start hearing the noises. Once the sound stops, take off the tape, and you should find the source of the leak.

Another way to test your windshield is to shower it with water gently. Use low pressure, as high water pressure can crack the glass. You should also avoid tailgating other vehicles. If you drive too closely to the vehicle ahead, pebbles and rocks can fly off the road and hit your windshield. This can cause chips or cracks that need to be repaired or replaced. This type of windshield damage is also common during severe weather events.

The windshield is one of the most vulnerable parts of your vehicle. It is exposed to various external elements and requires regular repair or replacement to maintain a safe driving experience. These elements include:

Small rocks and gravel kicked up from the tires of other vehicles can cause chips in your windshield. Keeping a safe distance while driving on gravel surfaces and switching lanes if you have to go behind a truck can minimize this problem. Driving with mud flaps on your tires is also helpful.

 Aside from road debris, pebbles, dirt, and other items can hit your windshield and cause damage. Parking under trees with branches that can fall on the car when windy is another common reason for this damage.

Some windshield cracks are caused by weather-related issues such as hot and cold temperatures or swift pressure changes. It is advisable to park in the shade or cover your car to minimize exposure to extreme temperature fluctuations.

A cracked windshield can be a safety hazard and may impair your vision. Additionally, it can decrease your car’s resale value. Suppose the crack extends to the edge of the windshield or the polyvinyl butyral layer. In that case, it becomes irreparable and should be replaced.

Another common cause of a cracked windshield is poor installation. If the windshield is not properly seated in the frame of your car, it can vibrate at high speeds on the highway and cause stress cracks. The best solution is to replace your windshield with a new, high-quality glass. If you’re concerned about the cost of replacing your windshield, ask our technicians for an estimate. We offer competitively priced aftermarket auto glass and replacement parts to help you save money.

Your windshield is an important safety feature in your vehicle. If cracked or damaged, it can significantly reduce your visibility while driving. As such, it’s important to have a reputable shop handle the replacement process. The simplest way to ensure quality is only to buy original equipment manufacturer (OEM) or OEM equivalent (OEE) glass. These are made by the same manufacturers that the car company uses, and they have a Department of Transportation (DOT) stamp to indicate they meet federal standards for auto glass.

Often, new vehicles come with a manufacturer’s warranty that covers certain issues for a set amount of time or miles. However, the specifics of a warranty will vary between different car manufacturers and models. It’s best to consult the manufacturer’s website or customer service for precise information.

Aside from the standard warranty, some shops also offer extended warranties. These can cover a range of additional components or repairs, and some may even include coverage for a windshield replacement. Be sure to review the details of any warranty carefully to determine whether or not it provides windshield coverage.

Many things can damage your windshield, including a rock kicked up from the road or extreme temperatures. It’s also possible for small cracks to turn into large ones over time. This can be a frustrating experience, but it’s also an indicator that it’s time to repair the windshield. A repair technician will assess the cracks and determine if they can be fixed. The type of crack and its depth are key factors in this determination. Typically, shallow cracks or chips that don’t penetrate the inner layer of the windshield can be repaired.

How Motorcycle Detailing Can Enhance the Look and Performance of Your Bike

Whether you ride your bike to work or cruise across town. Truck Detailing can keep it looking and performing its best. Read on to learn how to detail your motorcycle like a pro!

The type of motorcycle you have will influence how much work it takes to get it clean. For example, a chrome-rich bike may require more polishing than a chopper.

Whether you’re a newbie with your first scooter or an old pro with a brand-new liter-class sportbike, motorcycles offer plenty of room for aesthetic modifications. From a sleek new windscreen to a customized rear set, there’s a lot that you can do to add a personalized touch to your ride. However, some motorcycle accessories aren’t just for show – they can also help your bike perform better and enhance its safety.

For those who want to go the extra mile with their aesthetics, there are also custom rims and exhausts available that can make your bike look like it just came off the showroom floor. While a few of these mods can be expensive, they can be worth the price to keep your bike looking its best.

Aside from enhancing your ride’s aesthetics, detailing your bike can help you maintain its value over time. A well-maintained motorcycle is more likely to draw crowds at the local bike night or attract top dollar when it comes time to sell it. With the right cleaning products and techniques, you can keep your motorcycle looking its best for years.

Washing and detailing a motorcycle is much easier than washing and detailing a car. While it is true that a motorcycle’s size may shorten the overall cleaning time, other factors can make this assumption flawed. Motorcycles are often more intricate and contain far more dirt traps than cars. This means that a detailer will need to spend more time on certain parts of the motorcycle than would be the case for a larger vehicle.

Keeping your motorcycle’s paint job protected with quality wax will also improve its appearance and protection. After washing your motorcycle, apply a small amount of Meguiar’s carnauba wax to a microfiber applicator pad and begin rubbing it in circular motions, one section at a time. For maximum convenience, you can even buy pre-waxed microfiber towels that will save you some time. If you prefer to hand wax your bike, be sure to use paper or cloth towels that are fortified with Nylon (Nylon is a harder material than clear coat), so they’ll resist scratches.

Motorcycle detailing doesn’t only make your bike look better, it protects it as well. By thoroughly cleaning your bike, you remove dirt and other harmful substances that could damage the surface or accelerate rust and corrosion. Detailing products also provide an extra layer of protection by creating a protective seal over the surface. By regularly describing your bike, you will protect it from the elements and prolong its lifespan and resale value.

The painted surfaces of your bike are constantly exposed to the elements. Road salt, often used to melt ice during winter, can cause etching and erosion of the paint. By using a good quality degreaser, you can effectively clean your bike’s paint and prevent these problems from occurring.

Your bike’s leather and vinyl components are as important to keep protected as the metal parts. Dedicated motorcycle detailing products contain protectants to safeguard your leather seats and other components against the elements. Regular detailing will extend the life of your leather and vinyl and allow you to enjoy your ride in comfort for longer.

In addition to the protectants mentioned above, you can add additional layers of protection with motorcycle ceramic coatings. These nanotechnology-based coatings make your paint hydrophobic, meaning dirt and grime will slide right off rather than sticking and rubbing against the surface of your bike. This is a great way to keep your bike looking flawless and in pristine condition while making it easier to maintain.

Motorcycle detailing is an intricate and transformative process that takes your ride beyond a basic wash. By meticulously cleaning, restoring, and protecting all of the surfaces of your motorcycle, you will get back that showroom-worthy appearance and give your bike a new lease on life. For the best results, you can choose a mobile detailing service, which will eliminate the hassle of transporting your motorcycle and ensure that all surfaces are fully protected. For the ultimate in motorcycle detailing, check out our Motorcycle Ceramic Coating packages and get your bike protected!

A motorcycle is a lot like an automobile, but it requires extra attention to detail. The metal and chrome parts are constantly exposed to the elements, which can cause corrosion and dulling over time. Keeping your motorcycle clean with regular detailing will help it look as good as new and protect its value when you decide to sell it.

When deciding on a detailing service, choose one with a detailed knowledge of working with motorcycles. A professional will know how to restore the paint and metal to its original showroom shine without damaging any of the components underneath. They will also understand the importance of removing all the contaminants from the engine, pipes, and other areas usually hidden from view.

The level of contamination can determine the amount of work needed to get a bike back to its showroom shine. A dirty bike will require more decontamination than a clean one, which means using more products and taking more time. The type of motorcycle will also affect how much work it takes, with chopper and cruiser bikes usually needing more time for hand polishing than other types of bikes.

Another factor is the state of the components, such as the rust or corrosion on the wheels and chains, and how oxidation has affected the paint or plastics. In some cases, these can be fixed with a quick sand down and application of a high-quality protective coating.

Many people try to do their motorcycle detailing at home, but this can be a dangerous and time-consuming task. To avoid scratching the metal, you need to use special metal polishes and cleaners. Also, it would be best not to overheat the engine and pipes, which can damage them. To prevent this, you should always let the bike cool down before cleaning.

The best way to get to those tiny crevices is with a special tool specifically designed for motorcycle detailing. It’s similar to a screwdriver but has multiple heads of different sizes to fit in those tight spaces. This helps you reach places inaccessible with a regular brush or sponge.

Because motorcycles don’t have an interior of any kind, they are constantly exposed to the elements like UV rays, dirt, road salt, and chemical contamination. These contaminants can eat away at the metal parts of the bike, reducing its life and performance. This can result in rust, which can cause the bike to be unsafe for riders. Regular detailing and decontamination from a professional will prevent this from happening, increasing the vehicle’s safety for both the rider and the passenger.

The first step in a motorcycle detail is to rinse the vehicle with cool water using a regular garden hose. This will remove the larger pieces of debris and stubborn dirt from the bike before a wash mitt is used to clean the harder surfaces of the vehicle gently. The wash should be done carefully since some motorcycles have sensitive components, such as air filters or electrics, that the force of a pressure washer could damage.

If the motorcycle has leather or vinyl seats, a professional will use appropriate products to safely clean these materials without damaging them. These products will also help to improve the suppleness of the material, as well as protect it from the sun’s UV rays. If a motorcycle’s leather seats are not properly cared for, they can begin to crack and peel. This can be unsafe for the rider and passengers, who might slip off the seat when it is in motion.

Another important aspect of proper motorcycle detailing is removing any road salt from the aluminum parts of the vehicle, which can cause corrosion over time. This process is best carried out with a soft brush or with the help of a degreaser, which will be able to dissolve the grease and oil that are present on the surface. Then, the parts can be thoroughly rinsed with cool water, dried, and protected with a high-quality wax.

A thorough motorcycle detailing will also include cleaning the headlights and taillights, as it can be very difficult to see if they are covered in dust, dirt, or road salt. This is extremely important for safety, allowing other drivers to see the motorcycle in low-light conditions better.